A more technical approach to understanding your camera
Have you ever heard about, have a clue about or know what ‘shutter speed’, ‘aperture’ and ‘ISO’ stand for in the photography field? Have you ever ventured into the Manual Mode of your camera? Do you still want a quick summary, so you’ll be ready to take THE PERFECT PHOTO? Keep reading!


Let’s start with the boring stuff in a few lines:
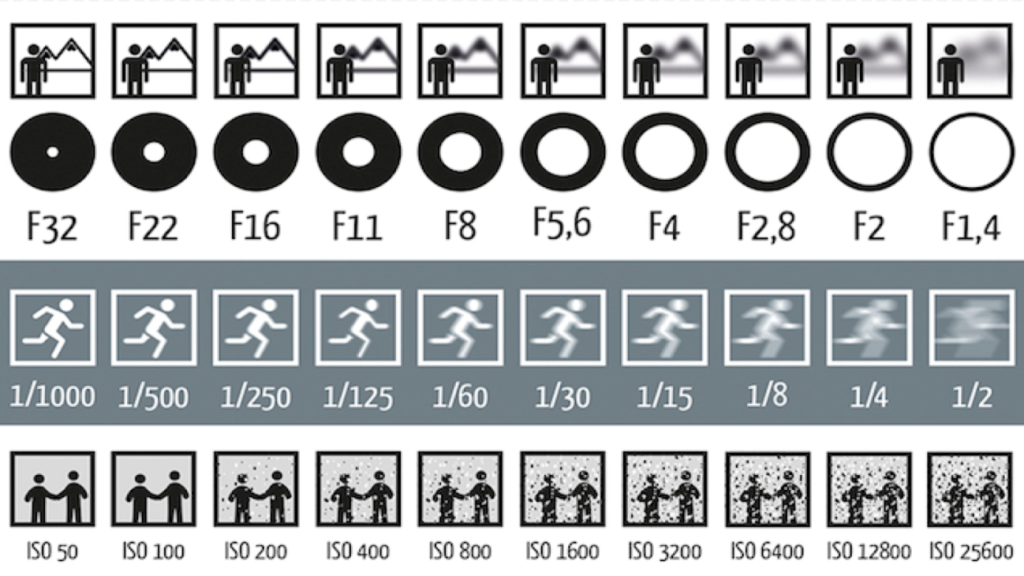
- Shutter Speed (S) is the amount of time the shutter remains open until the photo is taken (you will always see this number as a fraction of a second such as 1/8, 1/60, 1/250...).
The LOWER the number, the longer the shutter remains open, therefore more light comes into your camera. Using a lower S number while handholding your camera can make the photo a bit shaky as it captures the motion of any tiny movements as well as the one produced by your hands (i.e. ¼, 1/15, 1/25...).
The HIGHER the number, the shorter the shutter remains open, therefore less light comes into your camera. Using a high S number helps create a photo by freezing any movement without the photo being shaky (i.e. usually any fraction higher than 1/60-80).
- Aperture (A) (you will always see it as the number f) is how small or big the hole of our camera’s diaphragm is going to be, and it affects both the amount of light that comes into the camera as well as the depth of field.
The LOWER the number, the bigger the hole: more light comes into the camera and the photo has a shallower depth of field (i.e. f/1.4, f/1.8, f/2, f/2.8...).
The HIGHER the number, the smaller the hole: less light comes into the camera and the photo has a deeper depth of field (i.e. f/11, f/13, f/16...).
- ISO is light sensitivity of the camera’s sensor.
The LOWER the number, the less sensible to the light and the better the quality of photos (i.e. 100, 250, 400…).
The HIGHER the number, the more sensible to the light and the worse the quality of photos; noise (colour dots aberration and less sharpness) appears (i.e. 1250, 3200…).
So, once you reach this point, my biggest recommendation is to play around with all the different settings in different places and check out how they affect your photos regarding light and depth of field. When you figure it out and understand how it works, the rest is pretty easy; ‘practice makes perfect’. Go out, explore and keep on taking photos here and there; during daylight, in the night-time, in the city, in the woods... Be creative!
And here’s one last piece of advice to up your photography game and it all comes down to composition. Imagine your photo divided into nine equal sections by ‘drawing’ two horizontal and vertical lines (aka thirds) in any photo. Do you see those intersections where the lines cross? We call them ‘interest points’ and there are four. Place any subject or object in those points or even in the lines and instantly your photo will be more visually pleasing and interesting. And remember to ALWAYS do the following, no matter what: straighten the horizon and place it either in the first or second third or in the middle of your photo.
In the following chart, you can see everything I’ve talked about above all at once in a more visual way, and it can more easily help you understand the settings of your camera. You can come back to it as much as you need to check it out and help yourself. We all started from scratch at one point.
And if you have any doubts or questions about photography you can contact me at syphotography.93@gmail.com and I will gladly help you solve whatever problems you may have in the subject!
Copyright (©) 2010 - 2026 Youth Hostel | Our Privacy Policy | Cookies | | RPC